Table of Contents
- Introduction: Why the Smoky Eye Never Goes Out of Style
- Prep: Skin, Brows, and Base
- Essential Products & Tools
- Step-by-Step Smoky Eye Tutorial
- Pro Tips, Mistake Fixes, and Variations
- Jewelry Pairing: Match Your Metals & Stones
- Finish the Look: Lashes, Lips, and Setting
- Featured Products & Where to Buy
- Conclusion & Final Thoughts
Introduction: Why the Smoky Eye Never Goes Out of Style
The smoky eye is the makeup equivalent of a little black dress: timeless, flattering, and endlessly adaptable. Whether you're aiming for sultry evening drama or a soft daytime haze, this look flatters nearly every eye shape and color. In this guide you'll get a clear, friendly, step-by-step tutorial to build the smoky eye, plus smart jewelry pairings so your whole look reads cohesive and polished—like you planned it, but also like it was effortless (we both know you practiced twice in the mirror).
Prep: Skin, Brows, and Base
1. Start with Clean, Moisturized Skin
A smooth canvas means smoother blending. Cleanse, tone if you like, and apply a lightweight moisturizer. Let everything sink in for a minute; rushed base work is the fastest route to patchy eyeshadow. If you have oily lids, tap a touch of mattifying primer to the eyelid and lash line to keep pigments from slipping.
2. Groom Your Brows
Brows frame the eyes. Brush them up and fill sparse areas with small, hairlike strokes from a pencil or a micro brow pen. Balanced brows make even the smokiest of looks appear tidy instead of chaotic.
3. Prime the Lids and Conceal
Use an eyeshadow primer or a long-wear concealer across the lid to neutralize any discoloration. This brightens your lid and intensifies color payoff. Blend the edges so the shadow won’t look like it’s stuck to a strip of different skin.
Essential Products & Tools
The correct toolkit makes a smoky eye easy. You don't need a hundred palettes—just a few smart pieces.
Must-haves
- Matte neutral transition shade (taupe or soft brown)
- Deep matte shade for the outer corner (charcoal, deep brown, or black)
- Shimmer or satin shade for the lid or inner corner
- Long-wear black or brown eyeliner (pencil or gel)
- Volumizing mascara and optional false lashes
- Blending brush, small shader brush, and pencil brush
Recommended Products (click to view)
Here are some items we love for building depth and drama. Click the images to open the product pages.


Step-by-Step Smoky Eye Tutorial
Break it down into simple layers. Like a good story: base, conflict, climax, and resolution—also known as lid, crease, outer corner, and highlight.
Step 1: Set the Transition Shade
Using a fluffy blending brush, sweep a matte taupe or warm brown into the crease and slightly above it. Move the brush back and forth with soft windshield-wiper motions. Think of this as the scaffolding; it makes everything else look intentional. If you go too high, don’t panic—blend downward and add a touch of concealer to clean the edge.
Step 2: Build Depth
On a denser shader brush, pick up a deeper matte (medium brown to espresso). Press and blend this shade into the crease and outer V (the upper outer corner). Keep the pigment focused on the outer third of the lid and slightly into the crease; this creates dimension without obliterating your eye shape.
Step 3: Smoke the Lash Line
Line your upper and lower lash lines with a soft pencil liner—brown or black depending on how dramatic you want the look. Smudge it out immediately with a pencil brush or a smudging tool to avoid sharp edges. For an even smokier finish, set the liner with a matching eyeshadow.
Step 4: Add the Darkest Shade
Use a small, dense brush to apply your darkest shade (charcoal or matte black) just to the outermost corner and along the upper lash line. Blend carefully so the darkest tone dissipates into the transition shade. This is where you decide the intensity: more product = more drama. Less product = romantic smolder.
Step 5: Pop the Lid
For contrast, press a shimmer or satin shade (smoky bronze, gold, or champagne) onto the center or inner portion of the lid using a flat brush or fingertip. This step catches light and lifts the eye. If you’re feeling adventurous, a touch of a slightly metallic smoky topaz tone will make brown eyes sparkle like a rom-com finale.
Step 6: Highlight & Clean Up
Brighten the inner corner with a small dab of champagne highlight and sweep a matte shade under the brow to sharpen the silhouette. Clean the lower edge of the shadow with a concealer or a clean brush to make the line crisp—like Hemingway editing his best paragraph.
Step 7: Lashes & Finish
Curl lashes, apply two coats of volumizing mascara, and add falsies if desired. Lower lashes deserve a thinner coat of mascara for balance. Finish with a spray to set and meld the layers together.
Pro Tips, Mistake Fixes, and Variations
Fixes for Common Problems
- If the look is too harsh: blend with a clean fluffy brush in small circular motions.
- If the lid creases: use more primer and press powder lightly onto the lid before shadow.
- If you smudged under the eye: wait for fallout to settle, then sweep it away with a fluffy brush or use concealer to clean the area.
Variations
- Warm smoky: use bronze and amber tones. Great with gold jewelry.
- Cool smoky: use grays, charcoals, and icy silvers. Pairs beautifully with white gold or silver pieces.
- Subtle smoky: use softer browns and taupes for a day-appropriate haze.
Jewelry Pairing: Match Your Metals & Stones
Pairing jewelry with your smoky eye is a delightful finishing touch that elevates the whole look. The key is balance: let one element lead (usually the eyes) and use jewelry to support the story—not shout over it.
Metal Matching
- Warm smoky eyes (bronze, gold, brown) love warm metals like yellow gold, rose gold, and brass. They echo the warmth of the shadow and make brown and hazel eyes sing.
- Cool smoky eyes (charcoal, gray, silver) naturally pair with white gold, platinum, and sterling silver. These metals keep the palette crisp and elegant.
Stone Pairings
- Smoky topaz, tiger eye, and smoky quartz offer an earthy, sophisticated vibe that complements brown and green eyes. They add an organic glow. (Yes, nature does great contouring.)
- Black onyx or hematite gives a strong contrast that’s delicious with a bold, nighttime smoky eye.
- Champagne or champagne-topaz stones coordinate beautifully with warm shimmer on the lid.
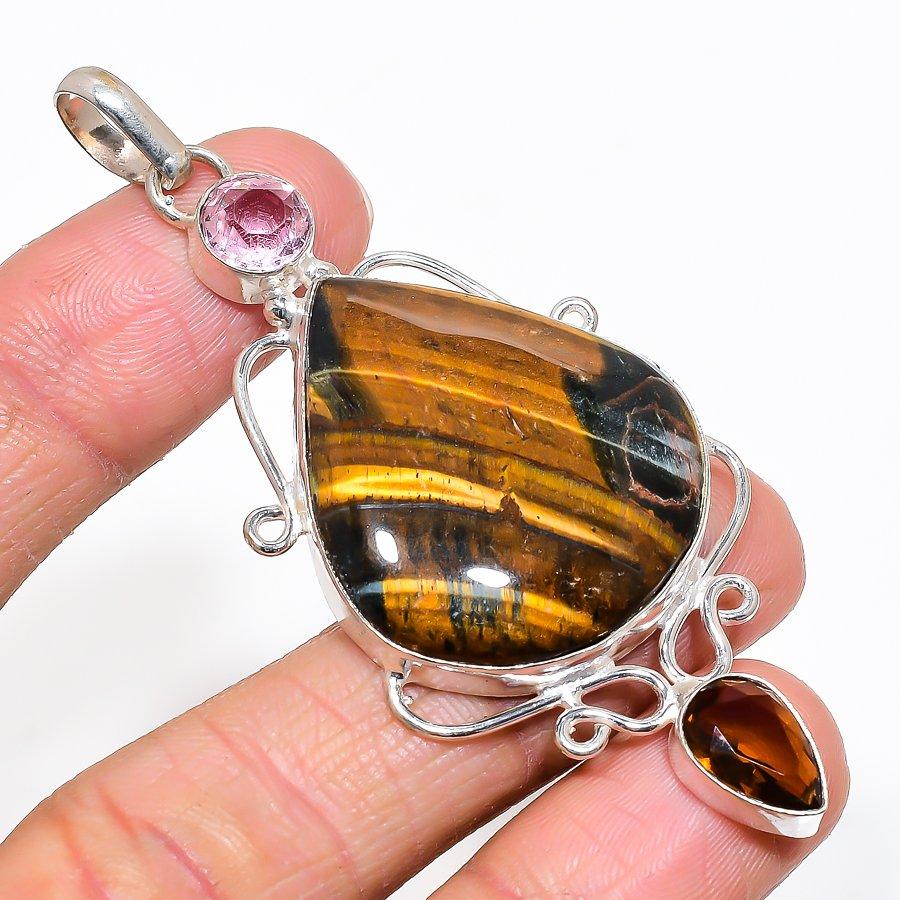
Want a tangible example? Click and admire this sterling silver pendant with smoky topaz—perfect for evening looks and a little mysterious, like your favorite thriller novel: see the smoky topaz pendant.
For a softer arm candy option try this elegant tiger eye and smoky quartz bracelet—great for daytime glam or low-key sparkle: discover the tiger eye bracelet.
Finish the Look: Lashes, Lips, and Setting
- Lashes: A fuller lash balances a heavy smoky eye. If you prefer subtlety, choose a lash with more length than volume.
- Lips: For intense smoky eyes, neutral lips are your friend—a soft nude, rosy mauve, or a glossy balm keeps the focus on the eyes. If you must rock red, choose a muted brick red and keep cheek color minimal.
- Setting: Use a setting spray to lock everything in place—especially if you’re dancing, dining, or doing a dramatic mic drop.
Featured Products & Where to Buy
Need quick recommendations? Here are a few curated picks to build a smoky eye kit, each linked for easy shopping.
SURRATT Smoky Eye Baton — a go-to shadow stick
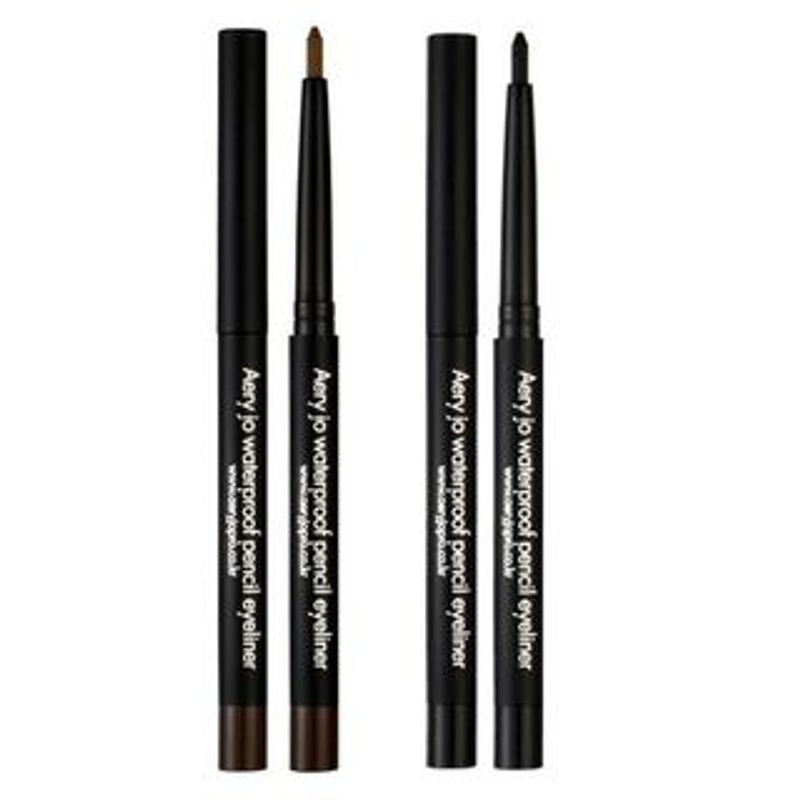
AERY JO Waterproof Pencil Eyeliner — smudge-resistant magic
Conclusion & Final Thoughts
The smoky eye is a classic for a reason: it’s versatile, flattering, and a little mysterious—like you when someone asks whether you rehearse your "I woke up like this" face. With a few smart products, a steady hand (or patient blending), and jewelry that harmonizes with your color story, you’ll create looks that feel both intentional and effortless.
Remember: makeup is play, and jewelry is punctuation. Together, they tell your visual sentence—make it witty, make it charming, and most importantly, make it you.
If you want to shop the items mentioned above quickly, here are the direct links again:
Grab the SURRATT Smoky Eye Baton
Check out the AERY JO eyeliner
Explore the Palganton smoky palette
Thanks for reading—now go blend, sparkle, and wear something fabulous. And if your smoky eye flirts with disaster, remember: a little more blending fixes everything. Almost like therapy, but cheaper and with better lighting.
Comments
Post a Comment